奥会津只見 イラスト美術館
 参考ビデオ:Image And Curved-Image Primitives (A-Frame Tutorial – WebVR) から
自身のUdemyのA-Frameコースのコンテンツの一部を、YouTubeチャンネルに公開されている方の”Learn A-Frame (WebVR)”プレイリストを見ながら進めています。詳しくはリンク先をご覧ください。
後日、Udemyのコースを購入したので、使用している画像はそこからダウンロードしたものです。アセットフォルダには、大きさ(1024*768ピクセル画像)を揃えた自分のイラストも追加しました。
a-curvedimageプリミティブの特徴は、各ピクセルが同じ距離にあるため、読みやすさに優れていることで、複雑なレイアウトには、平面に角度をつけたものより使用に適している。今回は、3つの画像を使ったレイアウトを試す。
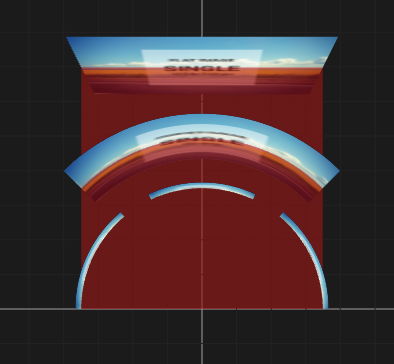
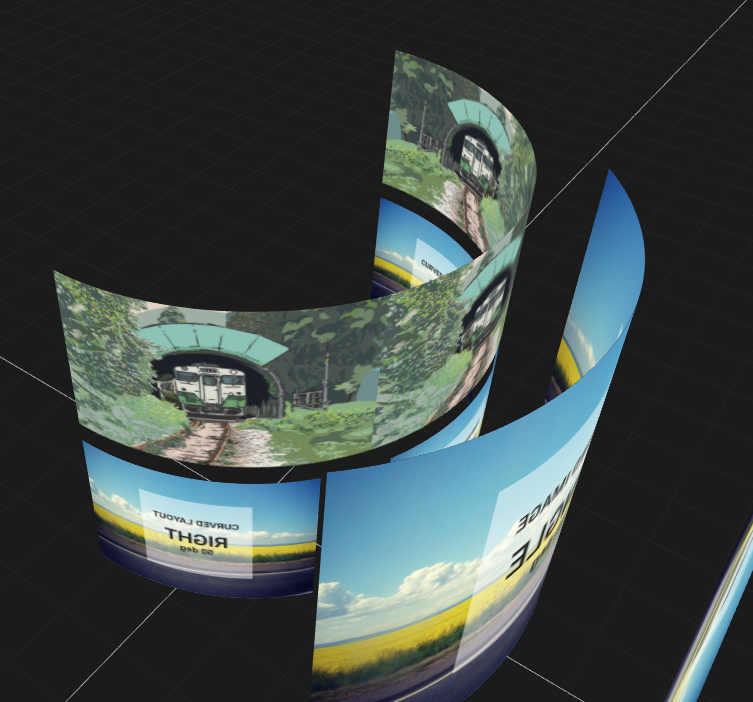
3つの画像を使ったレイアウトは、いわゆるこういう感じのを作るようです。
上から見た状態で、一番奥の平面はA-Frameを使ってみたい10 画像1で配置したa-imageプリミティブ。
真ん中の曲面がA-Frameを使ってみたい11 画像2で配置したa-curvedimageプリミティブ。
一番手前で、3枚でアーチを形成しているのが、今回作成する、3枚のa-curvedimageプリミティブ。
ビデオで言っているcomplex layoutsというのが、どの程度のものかが想像がつかないのですが、曲面の方が見やすそうなのは理解できる。
これから作っていくレイアウトは、カメラ周りの円形の部分で、3枚の中心角が180度、各画像の中心角は50度。
後ほど幅を必要な値にスケーリングできるように、円弧の幅は1mをデフォルトに設定する。これは円筒の直径に相当するため、半径は0.5mとなる。
<!-- curved image primitive 1024*768px 3 IMG layout->
      <!-- Angle Subtended by Arc 円弧の角度 = 180度 -->
      <!-- Angle Subtended by each image 各円弧の角度 = 50度 -->
      <!-- width of Arc 円弧の幅 DIAMETER = 1m -->
      <!-- Radius of Arc 円弧の半径 = 0.5m -->
      <a-curvedimage
        src="    "
        theta-length="50"
        theta-start="  "
        radius="0.5"
        height="     "
        position="0 1.5 0"
        scale="3 3 3">
</a-curvedimage>theta-startを90度に設定し、DOMセレクタ形式のIDを使って右に置く画像(img-03)を参照。
<!-- curved image primitive 1024*768px -3 IMG layout -->
<!-- Angle Subtended by Arc 円弧の角度 = 180度 -->
<!-- Angle Subtended by each image 各円弧の角度 = 50度 -->
<!-- width of Arc 円弧の幅 DIAMETER = 1m -->
<!-- Radius of Arc 円弧の半径 = 0.5m -->
<a-curvedimage
src="#img-03"
theta-length="50"
theta-start="90"
radius="0.5"
height=" "
position="0 1.5 0"
scale="3 3 3">
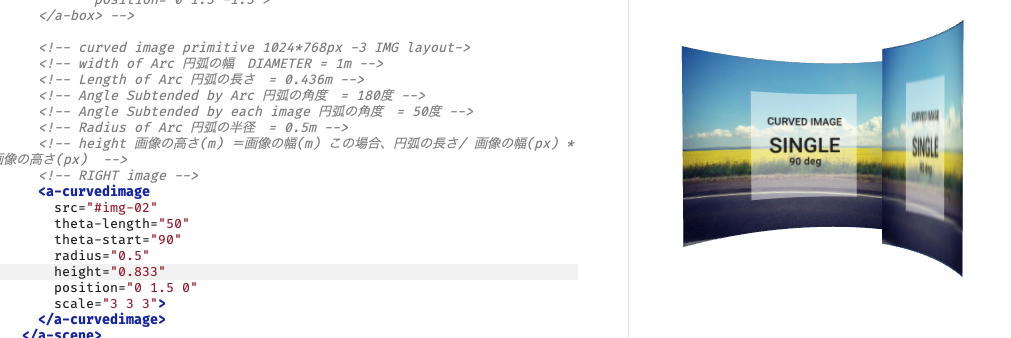
</a-curvedimage>まず向かって右の画像を作成中。プリミティブの開始位置のtheta-start属性のデフォルトは0。 1.2.0 > PRIMITIVES > <a-curvedimage>
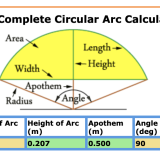
右側の画像の正しい高さの値を出すためには、円弧の長さを求める必要がある。
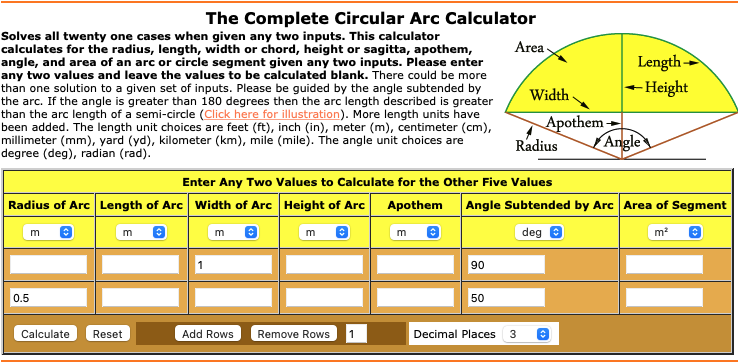
円弧の計算機に戻って、新しい行を追加(Add Rows)。
handymath.com > The Complete Circular Arc Calculator
半径0.5、画像の円弧に対する角度を50度にすると、円弧の長さは、0.436m。
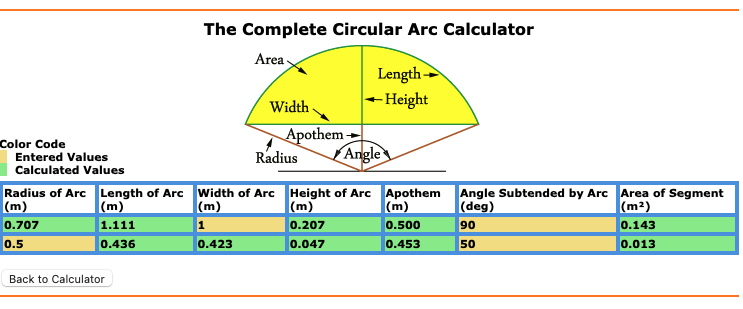
円弧の長さの値を使って画像の高さが求められる。
画像の高さ(m) =画像の幅(m) :この場合は円弧の長さ/ 画像の幅(px) * 画像の高さ(px)
= (0.436 meters / 1024 pixels ) x 768 pixels
= 0.327
前回の曲線のコードをコピーしたまま(height=0.833)だと、縦長に歪んでいる。今回計算で出した0.327をheightに代入すると、右に置いた画像の縦横比が正しく表示されるようになった。
(このあと画像も右画像(src="#img-03")に変えました。)
<!-- curved image primitive 1024*768px -3 IMG layout -->
<!-- Angle Subtended by Arc 円弧の角度 = 180度 -->
<!-- Angle Subtended by each image 各円弧の角度 = 50度 -->
<!-- width of Arc 円弧の幅 DIAMETER = 1m -->
<!-- Radius of Arc 円弧の半径 = 0.5m -->
<a-curvedimage
src="#img-03"
theta-length="50"
theta-start="90"
radius="0.5"
height="0.327"
position="0 1.5 0"
scale="3 3 3">
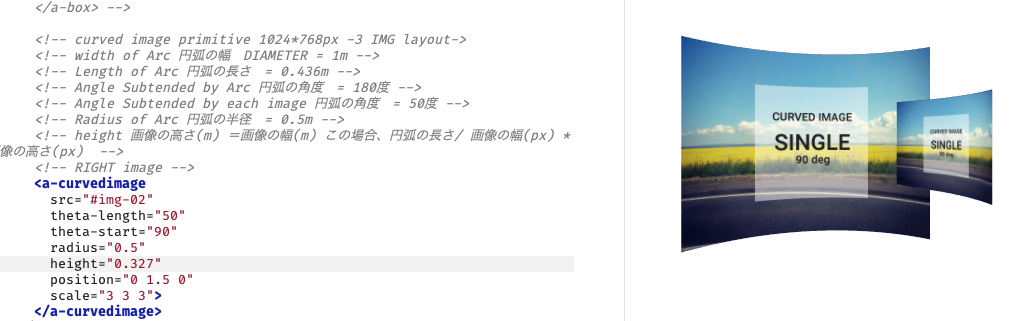
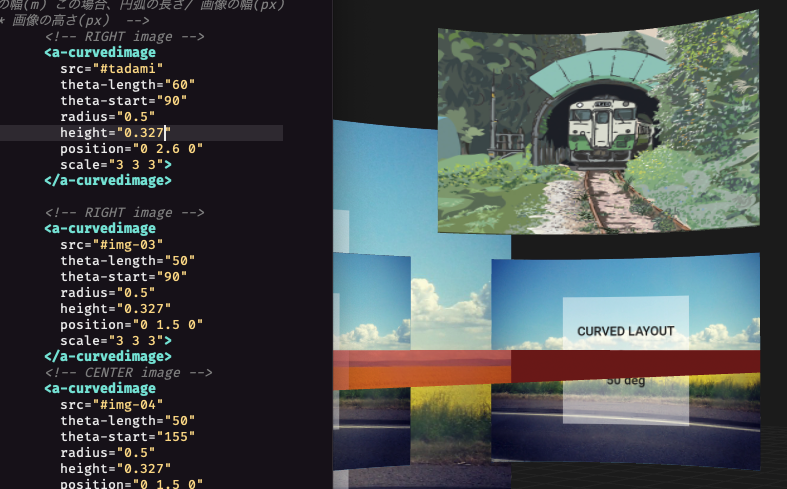
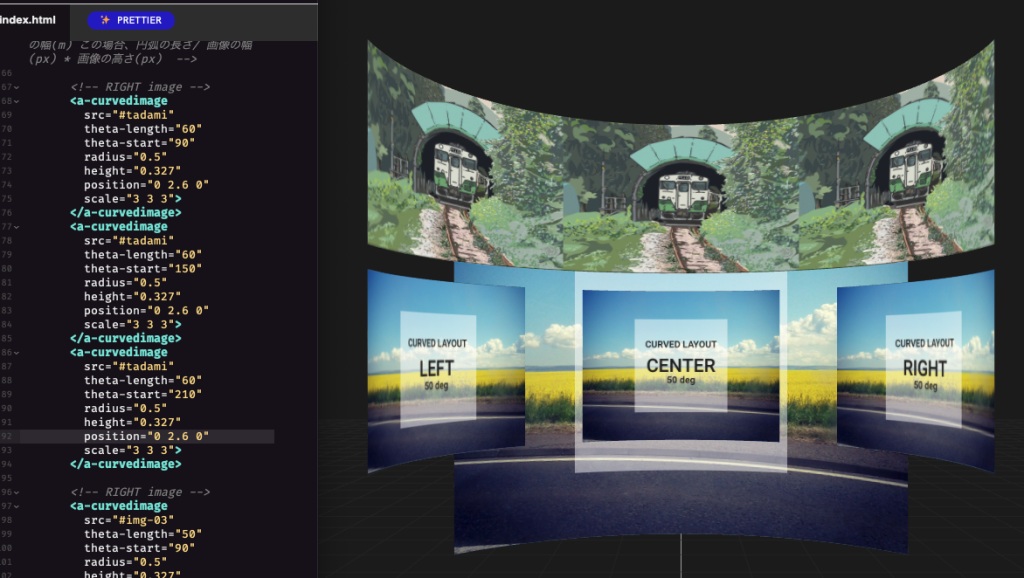
</a-curvedimage>作成したの画像をコピーし、円弧周りに並べていく。今度は中央に配置する画像(img-04)を参照。
開始位置のtheta-startは、180-25(theta-lengthの半分の値)= 155に設定することで中央に配置する。
右端の画像(img-05)のtheta-startは、270-50(この場合はtheta-lengthの値である50)= 220度。

<!-- 中央の画像 -->
<a-curvedimage
src="#img-04"
theta-length="50"
theta-start="155"
radius="0.5"
height="0.327"
position="0 1.5 0"
scale="3 3 3">
</a-curvedimage>
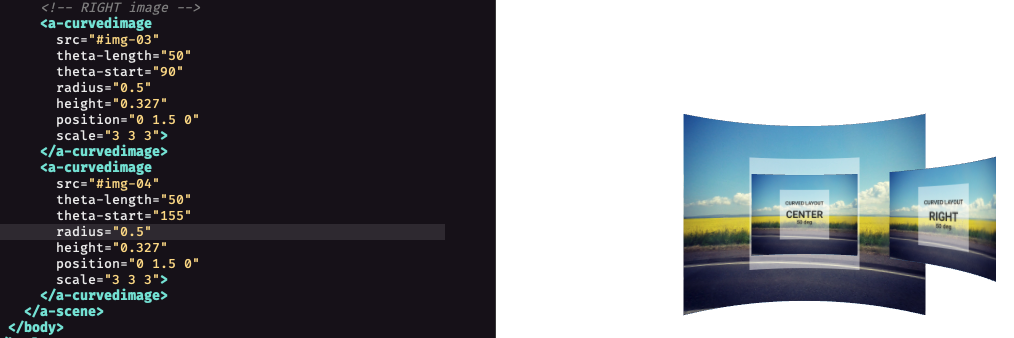
<!-- 左側の画像 -->
<a-curvedimage
src="#img-05"
theta-length="50"
theta-start="220"
radius="0.5"
height="0.327"
position="0 1.5 0"
scale="3 3 3">
</a-curvedimage>ポジションでコントロールするのでは無く、プリミティブの開始位置で設定するのか。。
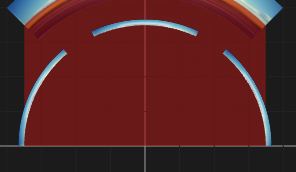
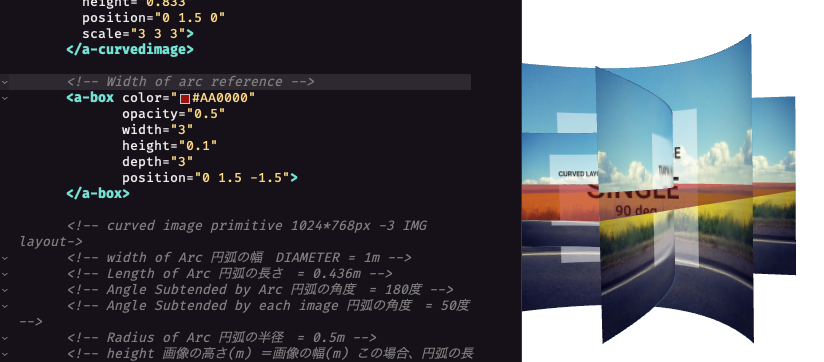
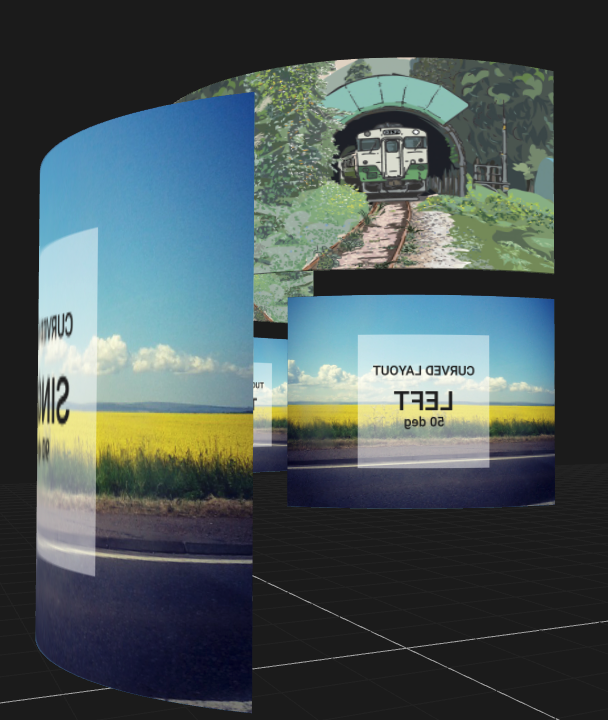
a-boxを置いて今まで配置したそれぞれの画像の幅の確認をしてみる。
平面を配置したa-imageプリミティブ、曲面1枚のa-curvedimageプリミティブ、そして今回配置した3枚のa-curvedimageのどれもが、全く同じ3m幅であることがわかる。
平面はA-Frameを使ってみたい10 画像1で配置したa-imageプリミティブ。
真ん中の曲面がA-Frameを使ってみたい11 画像2で配置したa-curvedimageプリミティブ。
一番手前で、3枚でアーチを形成しているのが、今回作成する、3枚のa-curvedimageプリミティブ。
このように、a-imageとa-curvedimageプリミティブをカスタムシーンで使用する際には、数学や実用的な方法を使って、簡単にそして歪むことなく変形させることができる。
<!-- 円弧の幅の確認用のa-boxプリミティブ -->
      <a-box color="#AA0000"
             opacity="0.5"
             width="3"
             height="0.1"
             depth="3"
             position="0 1.5 -1.5">
</a-box>それぞれの画像を50度にして間を開けている意図があまりわからなかったので、60度にしてそれぞれの隙間を無くして出来るかをやってみることに。
イラスト3枚合わせての円弧の角度と幅は変わらず、自分で描いた同じイラストを3枚並べることに。ポジションは、今まで作成したもののY軸上で上に配置されるよう、position=”0 2.6 0″。
<!-- curved image primitive 1024*768px 3 IMG layout->
<!-- Angle Subtended by Arc 円弧の角度 = 180度 -->
<!-- Angle Subtended by each image 各円弧の角度 = 60度 -->
<!-- width of Arc 円弧の幅 DIAMETER = 1m -->
<!-- Radius of Arc 円弧の半径 = 0.5m -->
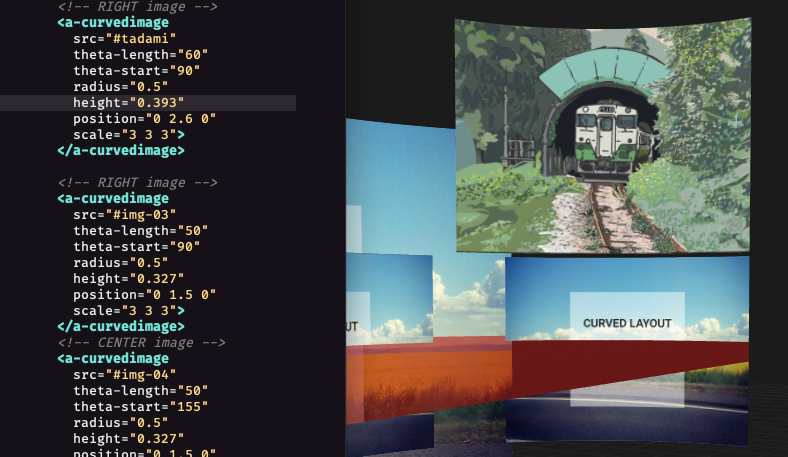
<a-curvedimage
src="#tadami"
theta-length="60"
theta-start="90"
radius="0.5"
height=" "
position="0 2.6 0"
scale="3 3 3">
</a-curvedimage>ちなみにこちらは前回の50度角と同じ高さheight="0.327"の場合の見た目。
円弧の長さを求める。
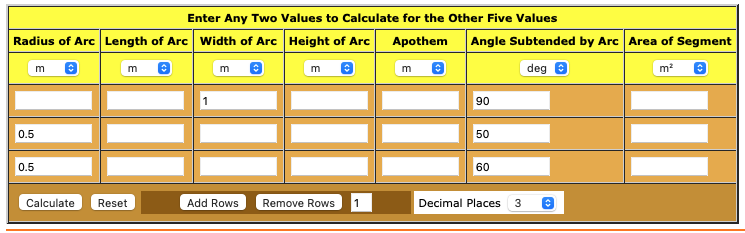
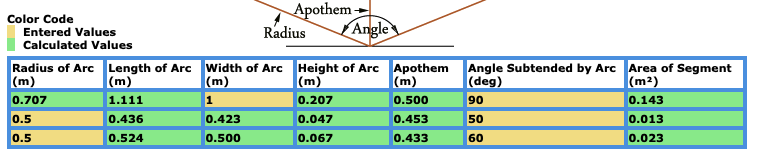
円弧の長さは、0.524mなので、高さは0.393m。
画像の高さ(m) =画像の幅(m) :この場合は円弧の長さ/ 画像の幅(px) * 画像の高さ(px)
= (0.524 meters / 1024 pixels ) x 768 pixels
= 0.393
<!-- curved image primitive 1024*768px 3 IMG layout->
      <!-- Angle Subtended by Arc 円弧の角度 = 180度 -->
      <!-- Angle Subtended by each image 各円弧の角度 = 60度 -->
      <!-- width of Arc 円弧の幅 DIAMETER = 1m -->
      <!-- Radius of Arc 円弧の半径 = 0.5m -->
      <a-curvedimage
        src="#tadami"
        theta-length="60"
        theta-start="90"
        radius="0.5"
        height="0.393"
        position="0 2.6 0"
        scale="3 3 3">
      </a-curvedimage>
コピーして、中央に置く2枚目、左側に置く3枚目の画像を配置。
中央に置く2枚目のtheta-startは、180-30(右の画像から相対的に考えると90+60)=150度。
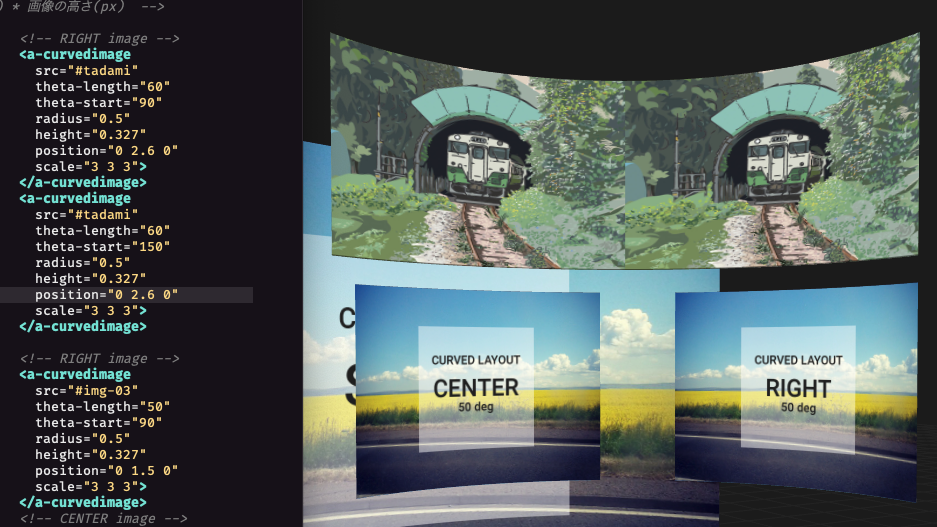
左側に置く3枚目のtheta-startは、270-60(中央の画像から相対的に考えると150+60)=210度。
<!-- 中央の画像 -->
      <a-curvedimage
        src="#tadami"
        theta-length="60"
        theta-start="150"
        radius="0.5"
        height="0.393"
        position="0 2.6 0"
        scale="3 3 3">
      </a-curvedimage>
<!-- 左側の画像 -->
      <a-curvedimage
        src="#tadami"
        theta-length="60"
        theta-start="210"
        radius="0.5"
        height="0.393"
        position="0 2.6 0"
        scale="3 3 3">
      </a-curvedimage>
あってそうな気はするけど、どうだろう。。
次回はプリミティブについてもう少し掘り下げていくようです。